[Learning Zephyr] 001. VS Code Settings
Zephyr development environment using Visual Studio Code
Overview
Hey, We installed Zephyr environment on shell before. To develop applications in better way, We’ll use Visual Studio Code. Which is a powerful and lightweight editor. Also has various extensions. This one is not an actual IDE(Integrated Development Environment), however, you would be able to make it an IDE like tool as you install extensions and set some configurations.
Install Visual Studio Code first if you haven’t installed it. You will see two options .deb and .rpm. I use Ubuntu 24.04 so I installed with .deb. 
After download, execute the following commands.
1
2
3
4
cd ~/Downloads

# Its name is various from the version.
sudo dpkg -i ./code_....deb
1. Creating an Isolated Development Environment
Visual Studio Code provides a quite good feature named Profile. As you switch your profiles to each different ones, You can work in development environments you want. The reason why using the profile feature is more important than anything else is to avoid error messages from the ESP-IDF extension in the same environment. It’s my experience.
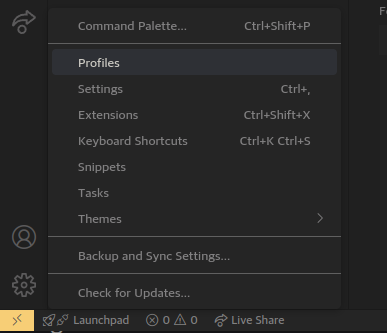
Open Visual Studio Code and take a look at the left down side of the window. There’s a button shaped like a gear. Click and select the Profiles menu.
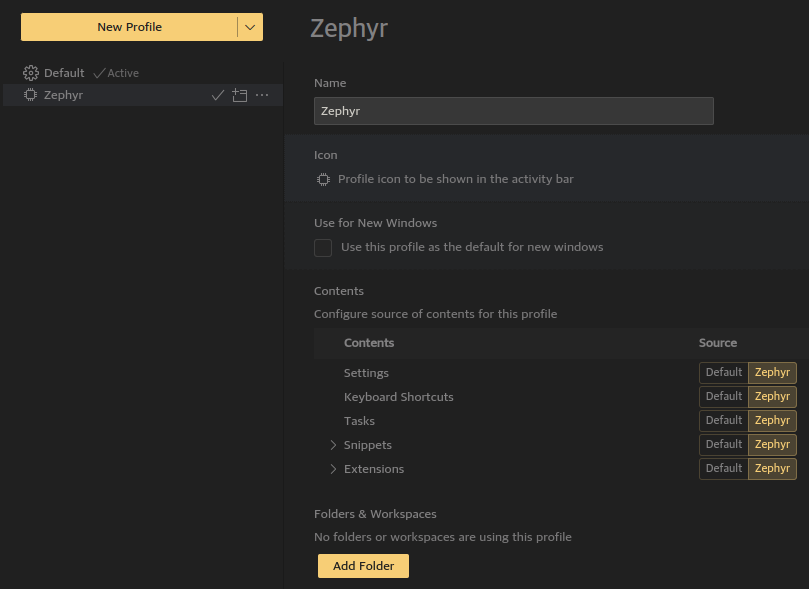
And push the New Profile button. then name the new profile you want to. And then set all inputs like below. All done, push the Create button.
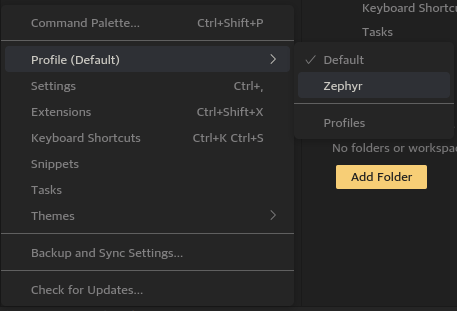
Click the gear button once again. You see the Zephyr profile like below? Select to change the profile to it.
2. Installing Extensions
Visual Studio Code has the modular system. You can configure the editor in what you want to make with installing extensions. Take a look at the left side of the editor. Do you see 田 shaped icon? Click and try searching for some extensions.
There are some useful extensions for Zephyr. I’m gonna let you know them.
2.1 C/C++
The C/C++ extension colorizes your C/C++ source code and runs C/C++ debuggers such as GDB, LLDB automatically when you start launch if you set configurations sainly. So it would be helpful.
Install it at here.
If you want to know more about the extension, read this documentation.
2.2 CMake Tools

The CMake Tools extension is totally a peice of shit but there’s any other choice. It gives helps with building source codes written in the CMake build system.
Install it at here.
If you want to know more about the extension, read this documentation.
2.3 Serial Monitor

The Serial Monitor extension is also totally a peice of shit but there’s any other choice. It provides a serial terminal interface in the editor.
Install it at here.
3. Setting Up
Open Visual Studio Code again with commands below because of some issues about Python and the ZEPHYR_BASE environment variable. If you just open Visual Studio Code, the CMake extension won’t find the west command and the Zephyr kernel location.
1
2
3
4
zenv
mkdir your-project-name
cd your-project-name
code .
Now we have to create files for the application project in order to practice Zephyr. Firstly open a terminal tab with Ctrl + Shift + ` and type the following commands.
1
2
3
4
5
6
7
8
9

# the 'touch' command creates an empty file
touch CMakeLists.txt
touch prj.conf
mkdir boards

# The official Zephyr kernel already has the board configs
touch boards/blackpill_f411ce.overlay
touch boards/blackpill_f411ce.conf
Try tree -a command and you see like below.
1
2
3
4
5
6
7
8
9
.
├── boards
│   ├── blackpill_f411ce.conf
│   └── blackpill_f411ce.overlay
├── CMakeLists.txt
├── prj.conf
└── src
    ├── CMakeLists.txt
    └── main.c
Open the top cmake script and write down the following content.
CMakeLists.txt
1
2
3
4
5
6
7
8
9
10
11
12
13
# Minimum version of CMake
cmake_minimum_required(VERSION 3.30)

# Directive to find the Zephyr package in your $HOME/.cmake/packages/**
find_package(Zephyr HINTS $ENV{ZEPHYR_BASE})

project(your-project-name
        VERSION 1.0.0
        LANGUAGES C ASM
        DESCRIPTION "Zephyr practice")

# This directive includes the subdirectory named src's CMakeLists.txt script
add_subdirectory(src)j
The Zephyr kernel already declared the app target so you can just define the target sources.
src/CMakeLists.txt
1
2
target_sources(app PRIVATE
               ${CMAKE_CURRENT_SOURCE_DIR}/main.c)
Fill the main source like below.
src/main.c
1
2
3
4
5
6
7
8
9
10
11
12
13
14
15
16
17
18
19
20
21
#include <zephyr/kernel.h>

int main(void) {
    while (true) {
        // printk() outputs strings
        // similar to printf in the standard C library
        printk("Hell Zephyr!: %s(%s, %s), %lldms\r\n",
            CONFIG_BOARD, // Your board name
            CONFIG_ARCH, // The board's CPU architecture
            CONFIG_SOC, // The board's SoC series
            k_uptime_get()); // This gets uptime from boot in ms

        // k_sleep() halts current thread
        // for time you set
        // You can set times following with macros
        // K_HOURS(), K_MINUTES(), K_SECONDS(),
        // K_MSEC(), K_USEC(), K_NSEC()
        k_sleep(K_SECONDS(1));
    }
    return 0;
}
Now run cmake -S. -Bbuild -DNO_BUILD_TYPE_WARNING=ON -DCONFIG_DEBUG=y -DCONFIG_DEBUG_THREAD_INFO=y -DCONFIG_NO_OPTIMIZATIONS=y -DBOARD=blackpill_f411ce -DCONF_FILE=prj.conf;boards/blackpill_f411ce.conf -DDTC_OVERLAY_FILE=boards/blackpill_f411ce.overlay command in the terminal to configure the project.
1
2
3
4
5
6
7
8
9
10
11
12
13
14
15
16
17
18
19
20
21
22
23
24
cmake \
  -S. \
  -Bbuild \
  -DNO_BUILD_TYPE_WARNING=ON \
  -DCONFIG_DEBUG=y \
  -DCONFIG_DEBUG_THREAD_INFO=y \
  -DCONFIG_NO_OPTIMIZATIONS=y \
  -DBOARD=blackpill_f411ce \
  -DCONF_FILE="prj.conf;boards/blackpill_f411ce.conf" \
  -DDTC_OVERLAY_FILE=boards/blackpill_f411ce.overlay

# Loading Zephyr default modules (Zephyr base).
# -- Application: /your/project/directory
# -- CMake version: 4.0.0
# -- Found Python3: /your/python/directory/python (found suitable version "3.12.3", minimum required is "3.10") found components: Interpreter
# -- Cache files will be written to: /home/username/.cache/zephyr
# -- Zephyr version: version (/zephyr/directory/zephyrproject/zephyr)
# -- Found west (found suitable version "version", minimum required is "0.14.0")
# -- Board: blackpill_f411ce, qualifiers: stm32f411xe
# -- ZEPHYR_TOOLCHAIN_VARIANT not set, trying to locate Zephyr SDK
# -- Found host-tools: zephyr 0.17.0 (/sdk/directory/zephyr-sdk-0.17.0)
# -- Found toolchain: zephyr 0.17.0 (/sdk/directory/zephyr-sdk-0.17.0)
# -- Found Dtc: /sdk/directory/zephyr-sdk-0.17.0/sysroots/x86_64-pokysdk-linux/usr/bin/dtc (found suitable version "1.6.0", minimum required is "1.4.6")
# ...
To build the project, Run cmake --build build -j$(nproc).
1
2
3
4
5
6
7
8
9
10
11
12
cmake --build build -j16

# [1/150] Preparing syscall dependency handling
#
# [2/150] Generating include/generated/zephyr/version.h
# -- Zephyr version: version (/zephyr/directory/zephyrproject/zephyr), build: vVERSION
# [150/150] Linking C executable zephyr/zephyr.elf
# Memory region         Used Size  Region Size  %age Used
#            FLASH:       51520 B       512 KB      9.83%
#              RAM:        7616 B       128 KB      5.81%
#         IDT_LIST:          0 GB        32 KB      0.00%
# Generating files from /your/project/directory/build/zephyr/zephyr.elf for board: blackpill_f411ce
To flash the binary, Run openocd -f interface/stlink.cfg -f target/stm32f4x.cfg -c "program build/zephyr/zephyr.bin 0x08000000 reset verify exit". To see more information about flashing, Here must be helpful.
1
2
3
4
5
6
7
8
9
10
11
12
13
14
15
16
17
18
19
20
21
22
23
24
25
26
27
28
29
30
31
32
openocd -f interface/stlink.cfg -f target/stm32f4x.cfg \
  -c "program build/zephyr/zephyr.bin 0x08000000 reset verify exit"

# Open On-Chip Debugger 0.12.0-g9ea7f3d-dirty (2025-03-12-21:00)
# Licensed under GNU GPL v2
# For bug reports, read
#         http://openocd.org/doc/doxygen/bugs.html
# Info : auto-selecting first available session transport "hla_swd". To override use 'transport select <transport>'.
# Info : The selected transport took over low-level target control. The results might differ compared to plain JTAG/SWD
# Info : clock speed 2000 kHz
# Info : STLINK V2J45S7 (API v2) VID:PID 0483:3748
# Info : Target voltage: 3.258863
# Info : [stm32f4x.cpu] Cortex-M4 r0p1 processor detected
# Info : [stm32f4x.cpu] target has 6 breakpoints, 4 watchpoints
# Info : starting gdb server for stm32f4x.cpu on 3333
# Info : Listening on port 3333 for gdb connections
# Info : Unable to match requested speed 2000 kHz, using 1800 kHz
# Info : Unable to match requested speed 2000 kHz, using 1800 kHz
# [stm32f4x.cpu] halted due to debug-request, current mode: Thread
# xPSR: 0x01000000 pc: 0x08000eb8 msp: 0x20000880
# Info : Unable to match requested speed 8000 kHz, using 4000 kHz
# Info : Unable to match requested speed 8000 kHz, using 4000 kHz
# ** Programming Started **
# Info : device id = 0x10006431
# Info : flash size = 512 KiB
# ** Programming Finished **
# ** Verify Started **
# ** Verified OK **
# ** Resetting Target **
# Info : Unable to match requested speed 2000 kHz, using 1800 kHz
# Info : Unable to match requested speed 2000 kHz, using 1800 kHz
# shutdown command invoked
Now connect your USB to TTL device to the board’s A9, A10 pins.
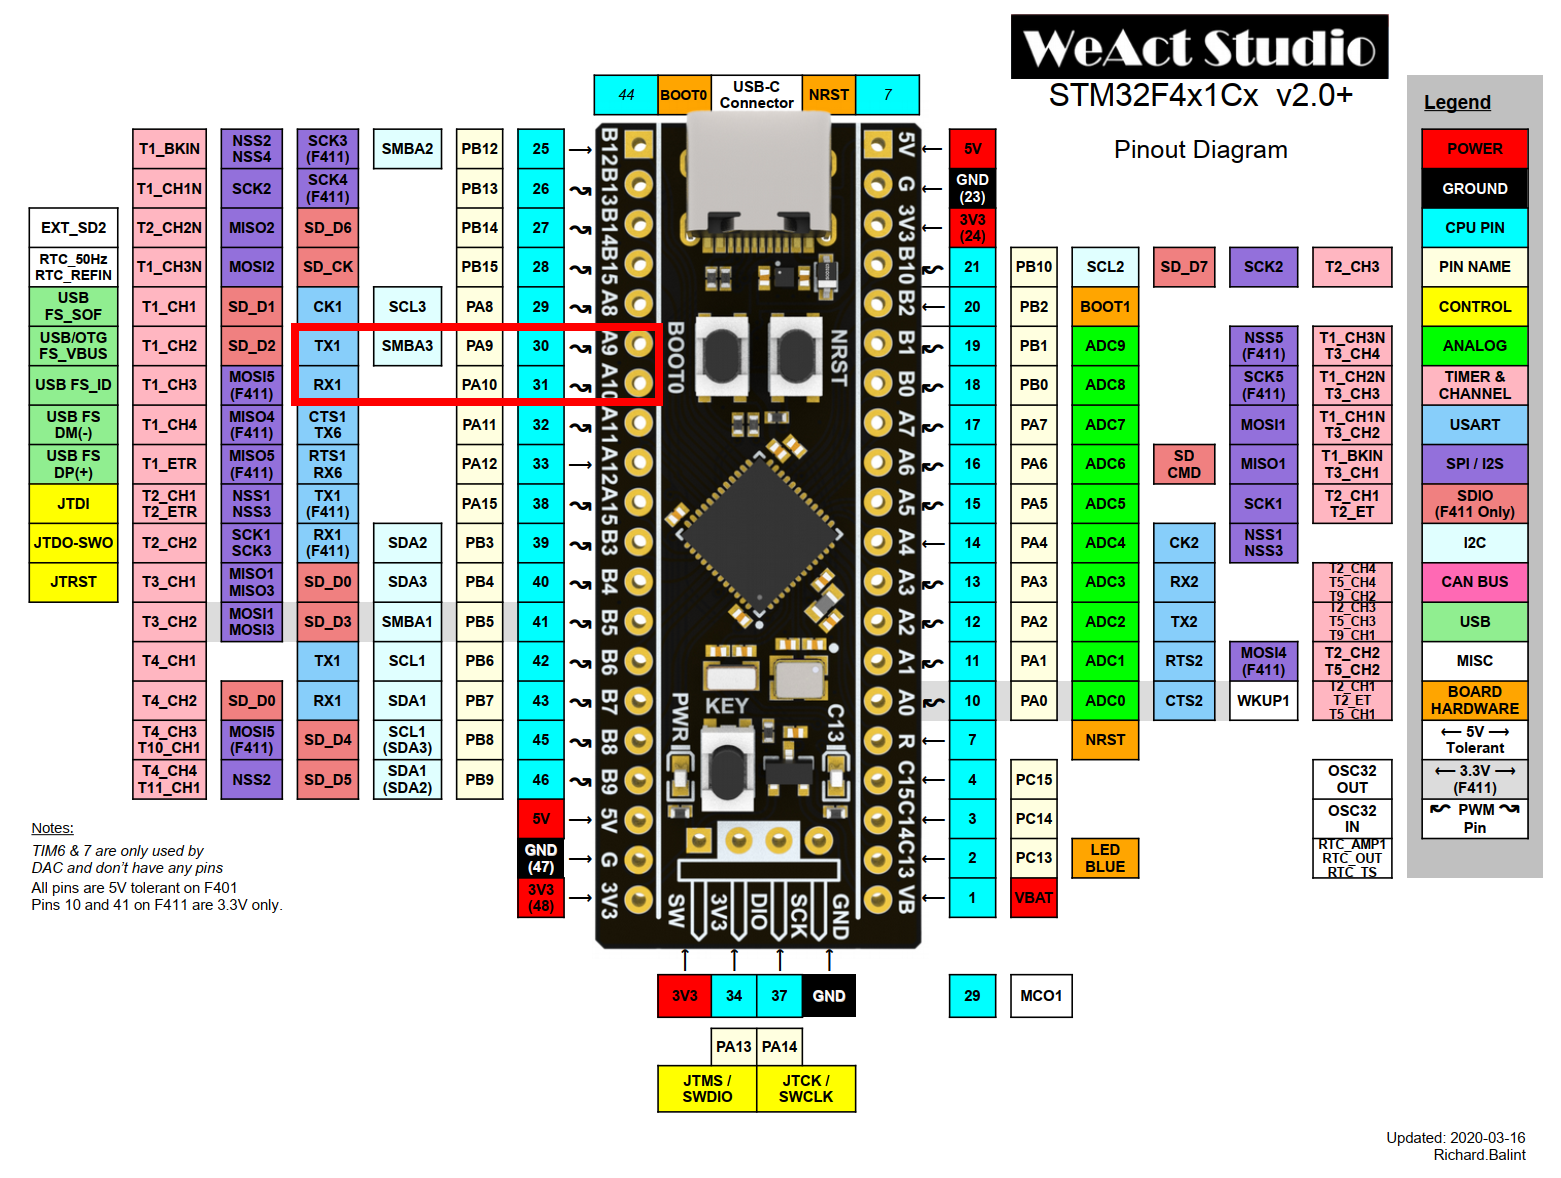
Open the serial monitor tab, Push the NRST button on board and see the serial outputs.

SERIAL MONITOR
1
2
*** Booting Zephyr OS build v4.1.0-2346-g781011b91173 ***
Hell Zephyr!: blackpill_f411ce(arm, stm32f411xe), 5ms
3.1 Setting Up with settings.json
You can configure the cmake build environment with just typing cmake -S. -Bbuild -DNO_BUILD_TYPE_WARNING=ON -DCONFIG_DEBUG=y ... every moment you fix cmake scripts. But your fingers don’t want overworking. So we are going to use settings.json and tasks.json in order to automate our jobs. In addition, we can debug the application with launch.json. Run commands below.
1
2
3
4
mkdir .vscode
touch .vscode/settings.json
touch .vscode/launch.json
touch .vscode/tasks.json
Firstly, settings.json file configures variety of extensions. To configure a specific extension, Keys and values are required like "<extension name>.<config name>": "<config value>". We’ll configure some CMake properties such as generator and configure args. Fill in the settings.json file contents as follows. More information about the settings you can set in your settings.json file can be found here.
.vscode/settings.json
1
2
3
4
5
6
7
8
9
10
11
12
13
14
15
16
17
18
19
20
21
22
{
    // Debug settings for Zephyr RTOS

    // This sets the generator to Ninja
    "cmake.generator": "Ninja",
    "cmake.configureArgs": [
        // Because the Zephyr doesn't use CMAKE_BUILD_TYPE so this variable setting helps to prevent warnings about it
        "-DNO_BUILD_TYPE_WARNING=ON",
        // This adds the compiler option -g
        "-DCONFIG_DEBUG=y",
        // This variable injects thread info into the output ELF file for debug
        "-DCONFIG_DEBUG_THREAD_INFO=y",
        // This variable prevents compiler optimizations so we can view any raw file in debugger sessions
        "-DCONFIG_NO_OPTIMIZATIONS=y",
        // This variable chooses the board we use
        "-DBOARD=blackpill_f411ce",
        // Your Zephyr project conf file and board specific conf file
        "-DCONF_FILE=${workspaceFolder}/prj.conf;${workspaceFolder}/boards/blackpill_f411ce.conf",
        // Devicetree overlay file for your board
        "-DDTC_OVERLAY_FILE=${workspaceFolder}/boards/blackpill_f411ce.overlay"
    ]
}
The variable ${workspaceFolder} in settings.json refers to your working directory. More information about the built-in variables can be found here.
Now open a command palette with Ctrl + Shift + p and enter CMake: Configure. You will see configure outputs on your output tab.
OUTPUT
1
2
3
4
5
6
7
[main] Configuring project: your-project-name
[proc] Executing command: /usr/bin/cmake -DCMAKE_BUILD_TYPE:STRING=Debug -DCMAKE_EXPORT_COMPILE_COMMANDS:BOOL=TRUE -DNO_BUILD_TYPE_WARNING=ON -DCONFIG_DEBUG=y -DCONFIG_DEBUG_THREAD_INFO=y -DCONFIG_NO_OPTIMIZATIONS=y -DBOARD=blackpill_f411ce "-DCONF_FILE=/your/project/directory/settings-json/prj.conf;/your/project/directory/boards/blackpill_f411ce.conf" -DDTC_OVERLAY_FILE=/your/project/directory/boards/blackpill_f411ce.overlay --no-warn-unused-cli -S/your/project/directory -B/your/project/directory/build -G Ninja
[cmake] Loading Zephyr default modules (Zephyr base).
...
[cmake] -- Configuring done (5.3s)
[cmake] -- Generating done (0.2s)
[cmake] -- Build files have been written to: /your/project/directory/build
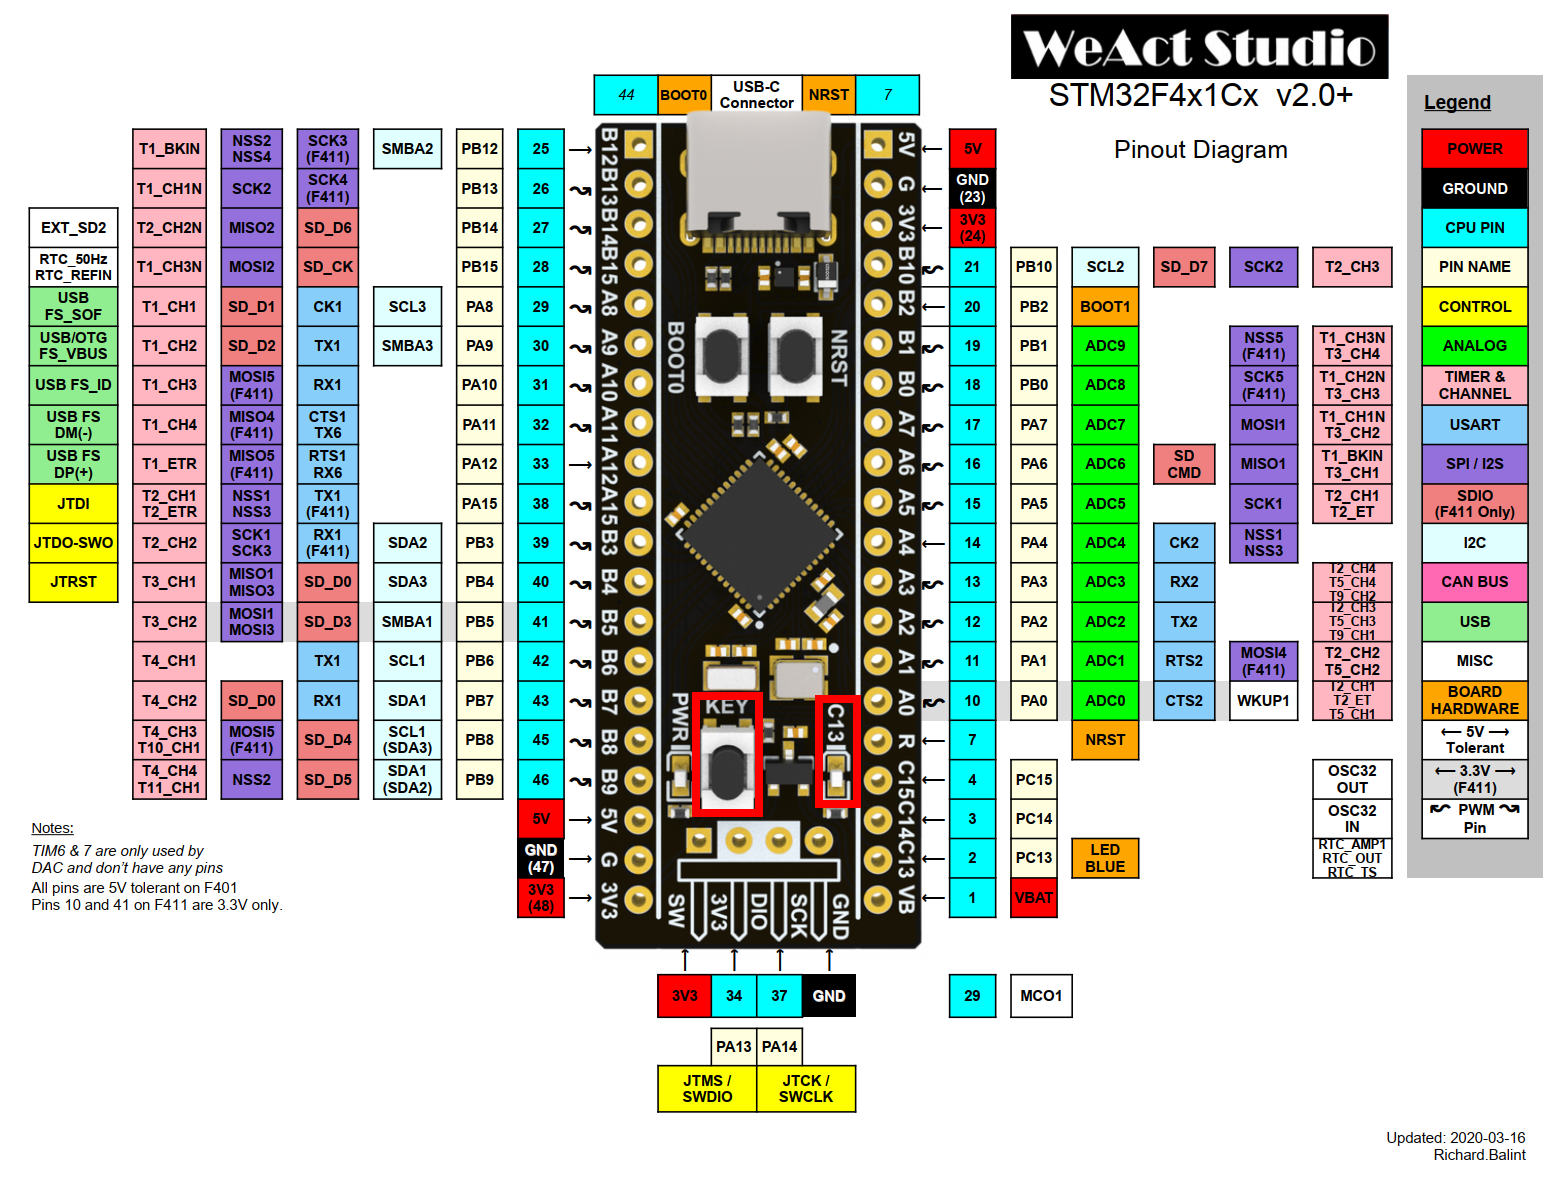
Let’s do something fun. Add a function below into main.c. This function is going to be called and turn on the built-in LED when you push the board’s user button.
src/main.c
1
2
3
4
5
6
7
8
9
10
11
12
13
14
15
16
17
18
19
20
21
22
23
24
25
26
27
28
29
30
31
32
33
34
35
36
37
38
39
40
41
42
43
#include <zephyr/kernel.h>
#include <zephyr/drivers/led.h>
#include <zephyr/input/input.h>

static void input_callback(struct input_event *evt, void *user_data)
{
    UNUSED(user_data);

    switch (evt->type) {
        case INPUT_EV_KEY: {
            switch (evt->code) {
                case INPUT_KEY_0: {
                    const struct led_dt_spec led =
                        LED_DT_SPEC_GET(DT_ALIAS(led0));
                    if (evt->value) { // Pushed
                        led_on_dt(&led);
                    } else {         // Released
                        led_off_dt(&led);
                    }
                    break;
                }
                default: {
                    printk("Unknown key code: %u\n", evt->code);
                    break;
                }
            }
            break;
        }
        default: {
            printk("Unknown key type: %u\n", evt->type);
            break;
        }
    }
}

INPUT_CALLBACK_DEFINE(NULL, input_callback, NULL);

int main(void) {
    printk("Hell Zephyr!: %s(%s, %s), %lldms\r\n",
        CONFIG_BOARD, CONFIG_ARCH, CONFIG_SOC, k_uptime_get());

    return 0;
}
Seems there’s no caller to call the function input_callback(). However, As you used the macro INPUT_CALLBACK_DEFINE(), The callback will be registered automatically while The Zephyr’s boot process. Let’s take a closer look about this dark magic next time.
Source code has been changed. I bet you wanna test the code right now. You should build the project in order to update your firmware binary. Open the command palette again and enter CMake: build.
OUTPUT
1
2
3
4
5
6
7
8
9
10
11
12
13
14
[main] Building folder: /your/project/directory/build
[build] Starting build
[proc] Executing command: /usr/bin/cmake --build /your/project/directory/build --config Debug --target all --
[build] [2/150   0% :: 0.029] Preparing syscall dependency handling
...
[build] [150/150 100% :: 3.834] Linking C executable zephyr/zephyr.elf
[build] Memory region         Used Size  Region Size  %age Used
[build]            FLASH:       51520 B       512 KB      9.83%
[build]              RAM:        7616 B       128 KB      5.81%
[build]         IDT_LIST:          0 GB        32 KB      0.00%
[build] Generating files from /your/project/directory/build/zephyr/zephyr.elf for board: blackpill_f411ce
[driver] Build completed: 00:00:03.878
[build] Build finished with exit code 0
We flashed firmware with CLI command before. We’ll make this boring job as defining a custom task. To avoid confusion with other task labels, Clarify what you want to do and what to use. This documentation explains how to define your custom tasks really well. Now let’s define our simple flashing firmware task.
.vscode/tasks.json
1
2
3
4
5
6
7
8
9
10
11
12
13
14
15
16
17
18
19
20
21
22
23
24
25
26
27
28
29
30
31
32
33
34
{
    "version": "2.0.0",
    "tasks": [
        {
            "label": "Flash App (blackpill_f411ce, openocd/stlink)",
            "type": "shell",
            "command": "openocd",
            "options": {
                "cwd": "${workspaceFolder}",
            },
            "args": [
                "-f",
                "interface/stlink.cfg",
                "-f",
                "target/stm32f4x.cfg",
                "-c",
                "program ${command:cmake.buildDirectory}/zephyr/zephyr.bin 0x08000000 reset verify exit"
            ],
            "presentation": {
                "echo": true,
                "reveal": "always",
                "focus": false,
                "panel": "shared",
                "showReuseMessage": false,
                "clear": true
            },
            "problemMatcher": [],
            "dependsOn": [
                // If CMake: build fails, this task won't be executed
                "CMake: build"
            ]
        }
    ]
}
To execute the task we just defined, Open the palette and select Tasks: Run Task And then Flash App (blackpill_f411ce, openocd/stlink).
TERMINAL
1
2
3
4
5
6
7
8
9
10
11
12
Open On-Chip Debugger 0.12.0-g9ea7f3d-dirty (2025-03-12-21:00)
Licensed under GNU GPL v2
For bug reports, read
        http://openocd.org/doc/doxygen/bugs.html
...
** Programming Finished **
** Verify Started **
** Verified OK **
** Resetting Target **
Info : Unable to match requested speed 2000 kHz, using 1800 kHz
Info : Unable to match requested speed 2000 kHz, using 1800 kHz
shutdown command invoked
Play with the built-in user button.
Your ST-Link is able to debug not only flashing firmware. Wouldn’t you love to see stack trace and control breakpoints? Define launch settings in launch.json. Launch types are depending on what you want to debug. For example, when you want to debug and trace CMake scripts, you should choose cmake. But we’re gonna debug the application binary, choose cppdbg. More information about the launch type cppdbg can be found here.
.vscode/launch.json
1
2
3
4
5
6
7
8
9
10
11
12
13
14
15
16
17
18
19
20
21
22
23
24
25
26
27
28
29
30
31
32
33
34
35
36
37
38
39
40
41
42
43
44
45
46
47
48
{
    "version": "0.2.0",
    "configurations": [
        // Flash & Debug configuration
        {
            "type": "cppdbg",
            "name": "App Flash & Debug (openocd/stlink/stm32f4x)",
            "request": "launch",
            "program": "${command:cmake.buildDirectory}/zephyr/zephyr.elf",
            "cwd": "${workspaceFolder}",
            "MIMode": "gdb",
            "miDebuggerPath": "${env:ZEPHYR_BASE}/../sdk/zephyr-sdk-0.17.0/arm-zephyr-eabi/bin/arm-zephyr-eabi-gdb",
            "externalConsole": false,
            "filterStderr": true,
            "filterStdout": false,
            "serverLaunchTimeout": 5000,
            "debugServerPath": "openocd",
            "debugServerArgs": "-f interface/stlink.cfg -f target/stm32f4x.cfg -c \"program ${command:cmake.buildDirectory}/zephyr/zephyr.bin 0x08000000 verify\" -c \"$_CHIPNAME.cpu configure -rtos Zephyr\"",
            "miDebuggerServerAddress": ":3333",
            "symbolLoadInfo": {
                "loadAll": true,
                "exceptionList": ""
            },
            "stopAtConnect": true,
            "stopAtEntry": true,
            "visualizerFile":"",
            "useExtendedRemote": true,
            "postRemoteConnectCommands": [
                {
                    "text": "-enable-pretty-printing"
                },
                {
                    "text": "maintenance flush register-cache"
                },
                {
                    "text": "mon reset halt"
                }
            ],
            "logging": {
                "moduleLoad": true,
                "trace": true,
                "engineLogging": true,
                "programOutput": true,
                "exceptions": true
            }
        }
    ]
}
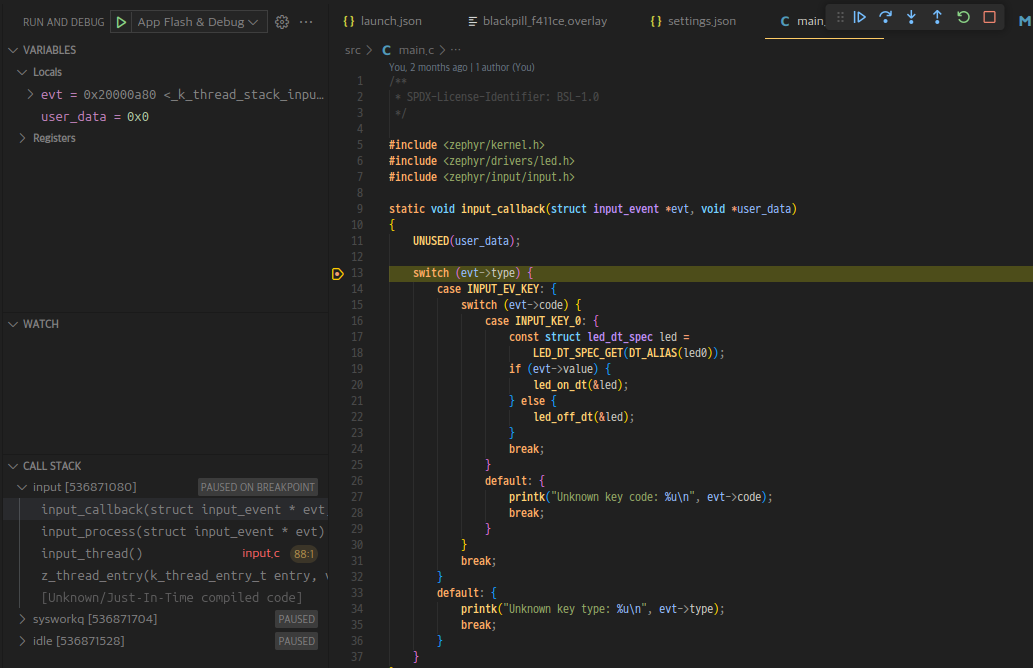
Now click on the left side of the function input_callback(). You will see a red dot created. That’s a breakpoint.

Launch a debug session with F5 key or selecting Debug: Start Debugging on the command palette. When a session started push the user button on your board and your session will be halted at the line where the red dot created. Try controlling your session with F5, F10, F11. These are continuation, stepping or something. Look around the debug tab, there are some fun reportings such as stack trace, variables. Here is a documentation about debugging.
If you want to see a complete example, check here.
3.2 Setting Up with CMakePresets.json
We have done a simple settings with JSON files in the .vscode directory. However, In production, We should have at least two types of build such as Debug and Release. Because the debug configuration has vulnerability in debug sections. furthermore, It’s binary size itself is too large. Besides, It’s application production. We should choose a board and board-specific options here.
A quite good feature is here. CMakePresets.json. With this, We can have multiple build options and fixed board settings.
Firstly, replace the all contents of the file .vscode/settings.json with below.
.vscode/settings.json
1
2
3
{
    "cmake.useCMakePresets": "always"
}
And create a file CMakePresets.json.
1
touch CMakePresets.json
Now make a skeleton like below.
CMakePresets.json
1
2
3
4
5
6
{
    "version": 8,
    "configurePresets": [

    ]
}
In the field "configurePresets", We can add each build configuration preset. A single preset must contain a field, "name". And a boolean field "hidden" doesn’t allow displaying in CMake. With these we can have base presets can be inherited from descendants.
CMakePresets.json
1
2
3
4
5
6
7
8
9
10
11
12
13
14
15
16
17
{
    "version": 8,
    "configurePresets": [
        {
            "name": "base",
            "hidden": true,
            "generator": "Ninja",
            "binaryDir": "${fileDir}/build/${presetName}",
            "cacheVariables": {
                "NO_BUILD_TYPE_WARNING": "ON",
                "BOARD": "${env:BOARD}",
                "CONF_FILE": "${fileDir}/prj.conf;${workspafileDirceFolder}/boards/${env:BOARD}.conf",
                "DTC_OVERLAY_FILE": "${fileDir}/boards/${env:BOARD}.overlay"
            }
        }
    ]
}
We brought some cmake variables in the file .vscode/settings.json. Now each debug and release preset base will be written below the base.
CMakePresets.json
1
2
3
4
5
6
7
8
9
10
11
12
13
14
15
16
17
18
19
20
21
22
23
24
25
26
27
28
29
30
31
32
33
34
35
36
{
    "version": 8,
    "configurePresets": [
        {
            "name": "base",
            "hidden": true,
            "generator": "Ninja",
            "binaryDir": "${fileDir}/build/${presetName}",
            "cacheVariables": {
                "NO_BUILD_TYPE_WARNING": "ON",
                "BOARD": "${env:BOARD}",
                "CONF_FILE": "${fileDir}/prj.conf;${workspafileDirceFolder}/boards/${env:BOARD}.conf",
                "DTC_OVERLAY_FILE": "${fileDir}/boards/${env:BOARD}.overlay"
            }
        },
        {
            "name": "debug-base",
            "hidden": true,
            "inherits": "base",
            "cacheVariables": {
                "CMAKE_BUILD_TYPE": "Debug",
                "CONFIG_DEBUG": "y",
                "CONFIG_DEBUG_THREAD_INFO": "y",
                "CONFIG_NO_OPTIMIZATIONS": "y"
            }
        },
        {
            "name": "release-base",
            "hidden": true,
            "inherits": "base",
            "cacheVariables": {
                "CMAKE_BUILD_TYPE": "Release"
            }
        }
    ]
}
The two are inheriting base and each has different "cacheVariable" contents. Also hidden.
And now I’ll append a base board preset.
1
2
3
4
5
6
7
8
9
10
11
12
13
14
15
16
17
18
19
20
21
22
23
24
25
26
27
28
29
30
31
32
33
34
35
36
37
38
39
40
41
42
43
44
45
46
{
    "version": 8,
    "configurePresets": [
        {
            "name": "base",
            "hidden": true,
            "generator": "Ninja",
            "binaryDir": "${fileDir}/build/${presetName}",
            "cacheVariables": {
                "NO_BUILD_TYPE_WARNING": "ON",
                "BOARD": "${env:BOARD}",
                "CONF_FILE": "${fileDir}/prj.conf;${fileDir}/boards/${env:BOARD}.conf",
                "DTC_OVERLAY_FILE": "${fileDir}/boards/${env:BOARD}.overlay"
            }
        },
        {
            "name": "debug-base",
            "hidden": true,
            "inherits": "base",
            "cacheVariables": {
                "CMAKE_BUILD_TYPE": "Debug",
                "CONFIG_DEBUG": "y",
                "CONFIG_DEBUG_THREAD_INFO": "y",
                "CONFIG_NO_OPTIMIZATIONS": "y"
            }
        },
        {
            "name": "release-base",
            "hidden": true,
            "inherits": "base",
            "cacheVariables": {
                "CMAKE_BUILD_TYPE": "Release"
            }
        },
        {
            "name": "blackpill_f411ce",
            "hidden": true,
            "environment": {
                "BOARD": "blackpill_f411ce"
            },
            "cacheVariables": {
                "CMAKE_BUILD_TYPE": "Release"
            }
        },
    ]
}
Most of all variables in CMakePreset.json is processed in lazy evaluation. So ${env:BOARD} in the base preset will be replaced with blackpill_f411ce since I declared an environment variable BOARD in the blackpill_f411ce preset.
The last ones left are just inheriting base presets.
1
2
3
4
5
6
7
8
9
10
11
12
13
14
15
16
17
18
19
20
21
22
23
24
25
26
27
28
29
30
31
32
33
34
35
36
37
38
39
40
41
42
43
44
45
46
47
48
49
50
51
52
53
54
{
    "version": 8,
    "configurePresets": [
        {
            "name": "base",
            "hidden": true,
            "generator": "Ninja",
            "binaryDir": "${fileDir}/build/${presetName}",
            "cacheVariables": {
                "NO_BUILD_TYPE_WARNING": "ON",
                "BOARD": "${env:BOARD}",
                "CONF_FILE": "${fileDir}/prj.conf;${fileDir}/boards/${env:BOARD}.conf",
                "DTC_OVERLAY_FILE": "${fileDir}/boards/${env:BOARD}.overlay"
            }
        },
        {
            "name": "debug-base",
            "hidden": true,
            "inherits": "base",
            "cacheVariables": {
                "CMAKE_BUILD_TYPE": "Debug",
                "CONFIG_DEBUG": "y",
                "CONFIG_DEBUG_THREAD_INFO": "y",
                "CONFIG_NO_OPTIMIZATIONS": "y"
            }
        },
        {
            "name": "release-base",
            "hidden": true,
            "inherits": "base",
            "cacheVariables": {
                "CMAKE_BUILD_TYPE": "Release"
            }
        },
        {
            "name": "blackpill_f411ce",
            "hidden": true,
            "environment": {
                "BOARD": "blackpill_f411ce"
            },
            "cacheVariables": {
                "CMAKE_BUILD_TYPE": "Release"
            }
        },
        {
            "name": "blackpill_f411ce-debug",
            "inherits": [ "blackpill_f411ce", "debug-base" ]
        },
        {
            "name": "blackpill_f411ce-release",
            "inherits": [ "blackpill_f411ce", "release-base" ]
        }
    ]
}
More information about the settings you can set in your CMakePresets.json file can be found here.
Let’s do another fun practice. The file board/blackpill_f411ce.overlay is empty. fill the content with below. We’ll blink our PWM LEDs alternately
board/blackpill_f411ce.overlay
1
2
3
4
5
6
7
8
9
10
11
12
13
14
/ {
	pwmleds: pwmleds {
    	status = "okay";
		compatible = "pwm-leds";

		pwmled0: pwmled0 {
			pwms = <&pwm4 1 65535 PWM_POLARITY_NORMAL>;
		};

		pwmled1: pwmled1 {
			pwms = <&pwm4 2 65535 PWM_POLARITY_NORMAL>;
		};
	};
};
PWMs of the board is predefined in the kernel source.
/path/to/zephyrproject/zephyr/boards/weact/blackpill_f411ce/blackpill_f411ce.dts
1
2
3
4
5
6
7
8
9
10
11
...
&timers4 {
status = "okay";
pwm4: pwm {
status = "okay";
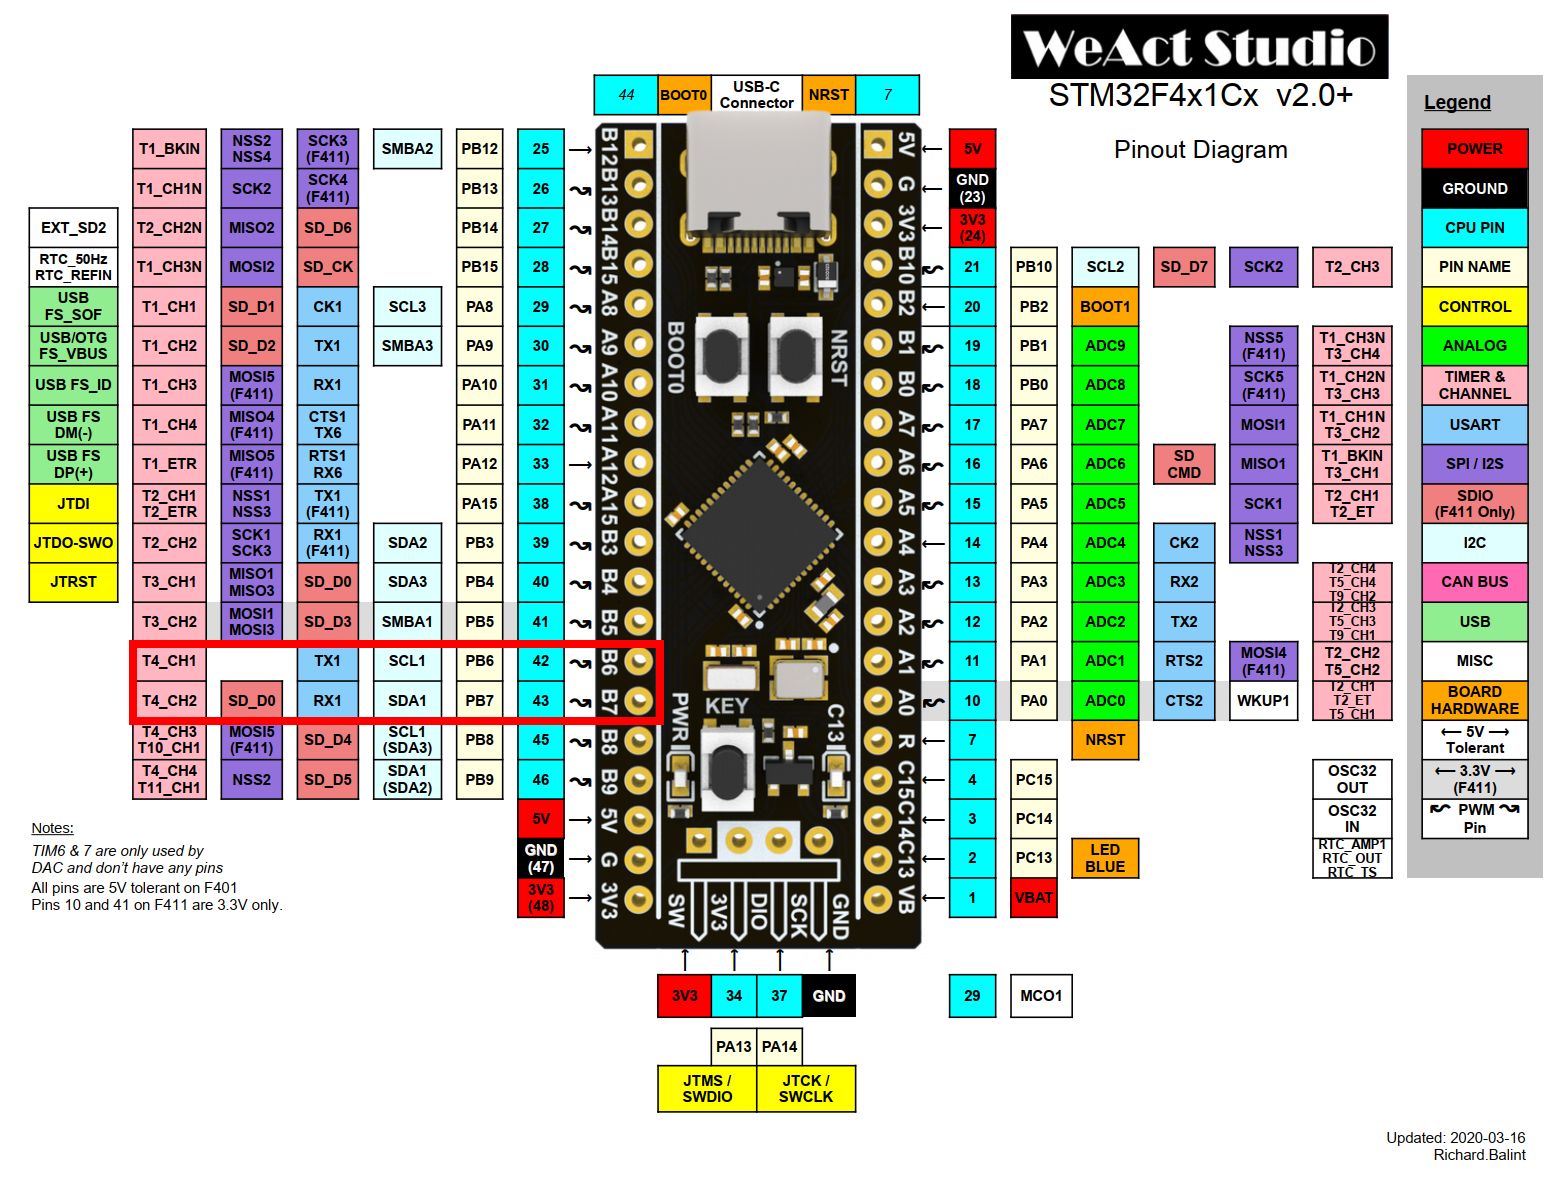
pinctrl-0 = <&tim4_ch1_pb6 &tim4_ch2_pb7>;
pinctrl-names = "default";
};
};
...
So, prepare two LEDs have different colour, And then connect to two pinouts, B6, B7.
Let’s fill content in the file src/main.c again.
1
2
3
4
5
6
7
8
9
10
11
12
13
14
15
16
17
18
19
20
21
22
23
24
25
26
27
28
29
30
31
32
33
34
35
36
37
38
39
40
41
42
43
44
45
46
47
48
49
50
51
52
53
54
55
56
57
58
59
60
61
62
63
64
65
66
67
68
69
70
71
#include <zephyr/kernel.h>
#include <zephyr/drivers/led.h>

// Declaring a PWM LED structure
struct pwmled_data {
    const struct led_dt_spec pwmled;
    bool dir;
    uint8_t brightness;
};

int main(void) {
    int ret;
    struct k_timer timer;
    // Declaring PWM LED instances
    struct pwmled_data pwmleds[] = {
        {
            .pwmled = LED_DT_SPEC_GET(DT_NODELABEL(pwmled0)),
            .dir = false,
            .brightness = 0,
        },
        {
            .pwmled = LED_DT_SPEC_GET(DT_NODELABEL(pwmled1)),
            .dir = true,
            .brightness = 100,
        }
    };

    // This macro helps to generate foreach like code
    ARRAY_FOR_EACH_PTR(pwmleds, pwmled) {
        if (!led_is_ready_dt(&pwmled->pwmled)) {
            printk("Error: LED %s is not ready\n",
                    pwmled->pwmled.dev->name);
            goto out;
        }
    }

    k_timer_init(&timer, NULL, NULL);
    k_timer_start(&timer, K_NO_WAIT, K_MSEC(5));

    while (true) {
        // Timers can be used as callback style or synchronous style like this
        int elapsed = k_timer_status_sync(&timer);
        if (elapsed > 1) {
            printk("Error: timer is %d ms late\n", elapsed);
            k_timer_stop(&timer);
            goto out;
        }

        ARRAY_FOR_EACH_PTR(pwmleds, pwmled) {
            ret = led_set_brightness_dt(&pwmled->pwmled, pwmled->brightness);
            if (ret) {
                printk("Error %d: failed to set pulse width\n", ret);
                k_timer_stop(&timer);
                goto out;
            }

            if (!pwmled->dir) {
                pwmled->brightness += 1;
            } else {
                pwmled->brightness -= 1;
            }

            if (pwmled->brightness == 0 || pwmled->brightness == 100) {
                pwmled->dir = !pwmled->dir;
            }
        }
    }

out:
    return 0;
}
Do the samething we have done previously such as build, flash, debug.
If you want to see a complete example, check here.
3.3 Setting Up with .code-workspace
It’s too fragmented to use our settings in the directory .vscode. So we’ll use more integrated environment. It’s .code-workspace. Its benefit is just a single configuration file itself. One more thing is we can add multiple workspace folders in it.
Remove the directory .vscode and just create a file with.
1
2
rm -rf .vscode
touch your-project-name.code-workspace
Now all the things we wrote will be inserted here. Here is a skeleton.
your-project-name.code-workspace
1
2
3
4
5
6
7
8
9
10
11
12
13
14
15
16
{
    "folders": [
    ],
    "settings": {
    },
    "tasks": {
        "version": "2.0.0",
        "tasks": [
        ]
    },
    "launch": {
        "version": "0.2.0",
        "configurations": [
        ]
    }
}
Add your project directory and the Zephyr kernel directory like this.
1
2
3
4
5
6
7
8
9
10
11
12
13
14
15
16
17
18
19
20
21
22
23
24
{
    "folders": [
        {
            "name": "application",
            "path": "."
        },
        {
            "name": "kernel",
            "path": "/absolute/path/to/kernel"
        }
    ],
    "settings": {
    },
    "tasks": {
        "version": "2.0.0",
        "tasks": [
        ]
    },
    "launch": {
        "version": "0.2.0",
        "configurations": [
        ]
    }
}
Then open the file your-project-name.code-workspace with shell commands zenv; code your-project-name.code-workspace. You should see two directories, your application project and kernel.
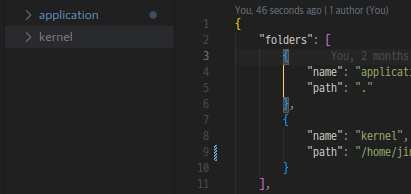
You see? You can now easily debug both kernel and application. Let’s complete this file with filling the rest. One thing you should be careful is using ${workspaceFolder:<folder name>} instead of just ${workspaceFolder}.
your-project-name.code-workspace
1
2
3
4
5
6
7
8
9
10
11
12
13
14
15
16
17
18
19
20
21
22
23
24
25
26
27
28
29
30
31
32
33
34
35
36
37
38
39
40
41
42
43
44
45
46
47
48
49
50
51
52
53
54
55
56
57
58
59
60
61
62
63
64
65
66
67
68
69
70
71
72
73
74
75
76
77
78
79
80
81
82
83
84
85
86
87
88
89
90
91
92
93
94
95
96
97
98
99
100
101
102
103
104
105
106
107
108
109
110
111
112
113
114
115
116
117
118
119
120
121
122
123
124
125
126
127
128
129
130
131
132
133
134
135
136
137
{
    "folders": [
        {
            "name": "application",
            "path": "."
        },
        {
            "name": "kernel",
            "path": "/absolute/path/to/kernel"
        }
    ],
    "settings": {
        "cmake.useCMakePresets": "always"
    },
    "tasks": {
        "version": "2.0.0",
        "tasks": [
            {
                "label": "Flash App (blackpill_f411ce, openocd/stlink)",
                "type": "shell",
                "command": "openocd",
                "options": {
                    "cwd": "${workspaceFolder:application}",
                },
                "args": [
                    "-f",
                    "interface/stlink.cfg",
                    "-f",
                    "target/stm32f4x.cfg",
                    "-c",
                    "program ${command:cmake.buildDirectory}/zephyr/zephyr.bin 0x08000000 reset verify exit"
                ],
                "presentation": {
                    "echo": true,
                    "reveal": "always",
                    "focus": false,
                    "panel": "shared",
                    "showReuseMessage": false,
                    "clear": true
                },
                "problemMatcher": [],
                "dependsOn": [
                    "CMake: build"
                ]
            }
        ]
    },
    "launch": {
        "version": "0.2.0",
        "configurations": [
            {
                "type": "cppdbg",
                "name": "App Flash & Debug (openocd/stlink/stm32f4x)",
                "request": "launch",
                "program": "${command:cmake.buildDirectory}/zephyr/zephyr.elf",
                "cwd": "${workspaceFolder:application}",
                "MIMode": "gdb",
                "miDebuggerPath": "${env:ZEPHYR_BASE}/../sdk/zephyr-sdk-0.17.0/arm-zephyr-eabi/bin/arm-zephyr-eabi-gdb",
                "externalConsole": false,
                "filterStderr": true,
                "filterStdout": false,
                "serverLaunchTimeout": 5000,
                "debugServerPath": "openocd",
                "debugServerArgs": "-f interface/stlink.cfg -f target/stm32f4x.cfg -c \"program ${command:cmake.buildDirectory}/zephyr/zephyr.bin 0x08000000 verify\" -c \"$_CHIPNAME.cpu configure -rtos Zephyr\"",
                "miDebuggerServerAddress": ":3333",
                "symbolLoadInfo": {
                    "loadAll": true,
                    "exceptionList": ""
                },
                "stopAtConnect": true,
                "stopAtEntry": true,
                "visualizerFile": "",
                "useExtendedRemote": true,
                "postRemoteConnectCommands": [
                    {
                        "description": "Enable pretty printing for gdb",
                        "text": "-enable-pretty-printing"
                    },
                    {
                        "text": "maintenance flush register-cache"
                    },
                    {
                        "text": "mon reset halt"
                    }
                ],
                "logging": {
                    "moduleLoad": true,
                    "trace": true,
                    "engineLogging": true,
                    "programOutput": true,
                    "exceptions": true
                }
            },
            {
                "type": "cppdbg",
                "name": "App Debug (openocd/stlink/stm32f4x)",
                "request": "launch",
                "program": "${command:cmake.buildDirectory}/zephyr/zephyr.elf",
                "cwd": "${workspaceFolder:application}",
                "MIMode": "gdb",
                "miDebuggerPath": "${env:ZEPHYR_BASE}/../sdk/zephyr-sdk-0.17.0/arm-zephyr-eabi/bin/arm-zephyr-eabi-gdb",
                "externalConsole": false,
                "filterStderr": true,
                "filterStdout": false,
                "serverLaunchTimeout": 5000,
                "debugServerPath": "openocd",
                "debugServerArgs": "-f interface/stlink.cfg -f target/stm32f4x.cfg -c \"$_CHIPNAME.cpu configure -rtos Zephyr\"",
                "miDebuggerServerAddress": ":3333",
                "symbolLoadInfo": {
                    "loadAll": true,
                    "exceptionList": ""
                },
                "stopAtConnect": true,
                "useExtendedRemote": true,
                "postRemoteConnectCommands": [
                    {
                        "description": "Enable pretty printing for gdb",
                        "text": "-enable-pretty-printing"
                    },
                    {
                        "text": "maintenance flush register-cache"
                    },
                    {
                        "text": "mon reset halt"
                    }
                ],
                "logging": {
                    "moduleLoad": true,
                    "trace": true,
                    "engineLogging": true,
                    "programOutput": true,
                    "exceptions": true
                }
            },
        ]
    }
}
Another fun practice. Writing our own driver API and instance. Device drivers in Zephyr are consisted of vtables. You may saw from somewhere e.g.
1
2
3
4
5
6
7
8
9
10
11
12
13
14
15
16
17
18
19
20
21
22
23
24
25
26
27
28
29
30
31
32
33
34
35
struct my_object;

struct my_api {
    int hey(struct my_object *obj, int foo);
    int hi(struct my_object *obj, float bar);
};

struct my_object {
    struct my_api api;
};

static inline int my_foo(struct my_object *obj, int foo) {
    obj->api.hey(obj, foo);
}
static inline int my_foo(struct my_object *obj, float bar) {
    obj->api.bar(obj, bar);
}

// ...
// ...

static int some_foo(struct my_object *obj, int foo) {
    // ...
}

static int some_bar(struct my_object *obj, float bar) {
    // ...
}

struct my_object my_instance = {
    .api = {
        .foo = some_foo,
        .bar = some_bar
    }
};
Getting used to this style is important. It’s so-called C style object oriented programming.
Let’s apply this style to src/main.c.
1
2
3
4
5
6
7
8
9
10
11
12
13
14
15
16
17
18
19
20
21
22
23
24
25
26
27
28
29
30
31
32
33
#include <zephyr/kernel.h>
#include <zephyr/device.h>

// Virtual function aliases
typedef int (*my_device_do_something_t)(const struct device *dev, int val);
typedef int (*my_device_do_something_else_t)(const struct device *dev);

// API declaration
struct my_device_driver_api {
    my_device_do_something_t do_something;
    my_device_do_something_else_t do_something_else;
};

// do_something API call binding
static inline int my_device_do_something(const struct device *dev, int val)
{
    const struct my_device_driver_api *api = dev->api;
    return api->do_something(dev, val);
}

// do_something_else API call binding
static inline int my_device_do_something_else(const struct device *dev)
{
    const struct my_device_driver_api *api = dev->api;
    return api->do_something_else(dev);
}

int main(void) {
    int ret;

out:
    return ret;
}
Zephyr’s device instances are always struct device objects. No inheritance or something. Then how can they contain device specific config or state data? See fields of struct device.
/path/to/kernel/include/zephyr/device.h
1
2
3
4
5
6
7
8
9
10
11
12
13
14
15
16
17
18
19
20
21
22
23
24
// ...
struct device {
        const char *name;
        const void *config;
        const void *api;
        struct device_state *state;
        void *data;
        struct device_ops ops;
        device_flags_t flags;
#if defined(CONFIG_DEVICE_DEPS) || defined(__DOXYGEN__)
        Z_DEVICE_DEPS_CONST device_handle_t *deps;
#endif /* CONFIG_DEVICE_DEPS */
#if defined(CONFIG_PM_DEVICE) || defined(__DOXYGEN__)
        union {
                struct pm_device_base *pm_base;
                struct pm_device *pm;
                struct pm_device_isr *pm_isr;
        };
#endif
#if defined(CONFIG_DEVICE_DT_METADATA) || defined(__DOXYGEN__)
        const struct device_dt_metadata *dt_meta;
#endif /* CONFIG_DEVICE_DT_METADATA */
};
// ...
In driver implementations, We can only use fields const void *config, void *data. So, We’ll declare our own implementation config and data structures below the main function.
src/main.c
1
2
3
4
5
6
7
8
9
10
11
12
13
14
15
//...
int main(void) {
    int ret;

out:
    return ret;
}

struct my_device_some_impl_data {
    int foo;
};

struct my_device_some_impl_config {
    int bar;
};
We’ll now implement our own API, my_device_do_something(), my_device_do_something_else() implementations. Zephyr provides a macro DEVICE_API(). This macro helps to define our own API.
src/main.c
1
2
3
4
5
6
7
8
9
10
11
12
13
14
15
16
17
18
19
20
21
22
23
24
25
26
27
28
29
30
31
32
33
34
//...
struct my_device_some_impl_data {
    int foo;
};

struct my_device_some_impl_config {
    int bar;
};

static int my_device_some_impl_do_something(const struct device *dev, int val)
{
    struct my_device_some_impl_data *data = dev->data;

    data->foo += val;

    printk("Did something! foo=%d\n", data->foo);
    return 0;
}

static int my_device_some_impl_do_something_else(const struct device *dev)
{
    struct my_device_some_impl_data *data = dev->data;
    const struct my_device_some_impl_config *config = dev->config;

    data->foo += config->bar;

    printk("Did something else! foo=%d\n", data->foo);
    return 0;
}

static DEVICE_API(my_device, some_impl_api) = {
    .do_something = my_device_some_impl_do_something,
    .do_something_else = my_device_some_impl_do_something_else,
};
All drivers in Zephyr must have initialization. So add my_impl_init() below. Then declare data and config for our device instance 0.
src/main.c
1
2
3
4
5
6
7
8
9
10
11
12
13
//...
static int my_impl_init(const struct device *dev)
{
    printk("Device %s initialized!\n", dev->name);
    return 0;
}

static struct my_device_some_impl_data my_impl_data0 = {
    .foo = 0,
};
static struct my_device_some_impl_config my_impl_config0 = {
    .bar = 2,
};
Although this init function is empty, In the real world, We all have destiny suffured from circuit short, timing mismatch, etc.
We implemented our own initialization function and data, config instances, but seems there’s no caller in this source code. And no instance it seems. Zephyr provides some dark magic.
src/main.c
1
2
3
4
//...
DEVICE_DEFINE(my_device_some_impl0, "my_device0", my_impl_init,
    my_impl_init, &my_impl_data0, &my_impl_config0,
    POST_KERNEL, CONFIG_KERNEL_INIT_PRIORITY_DEFAULT, &some_impl_api);
Details for device drivers are to be explained next time. Let’s just use the driver in the main function.
src/main.c
1
2
3
4
5
6
7
8
9
10
11
12
13
14
15
16
17
18
19
20
21
22
23
24
25
26
27
28
29
30
31
32
33
34
35
int main(void) {
    int ret;
    const struct device *dev =
        device_get_binding("my_device0");
    if (!dev) {
        printk("Failed to get device\n");
        ret = -ENODEV;
        goto out;
    }

    if (!device_is_ready(dev)) {
        printk("Device is not ready\n");
        ret = -ENODEV;
        goto out;
    }

    while (true) {
        ret = my_device_do_something(dev, 3);
        if (ret) {
            printk("Failed to do something\n");
            goto out;
        }

        ret = my_device_do_something_else(dev);
        if (ret) {
            printk("Failed to do something else\n");
            goto out;
        }

        k_sleep(K_MSEC(1000));
    }

out:
    return ret;
}
Do build, flash, debug. Watch the serial monitor whether the application runs sanely or not.
If you want to see a complete example, check here.
Conclusion
Next time we’ll debug Zephyr’s boot process. Thanks for reading this post.
All examples in this post is at here.